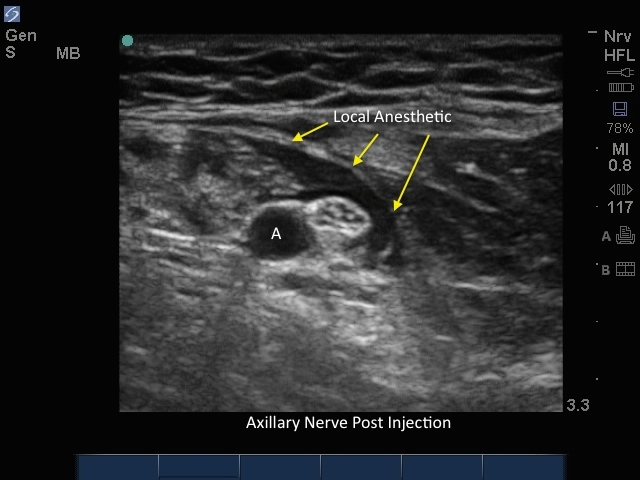
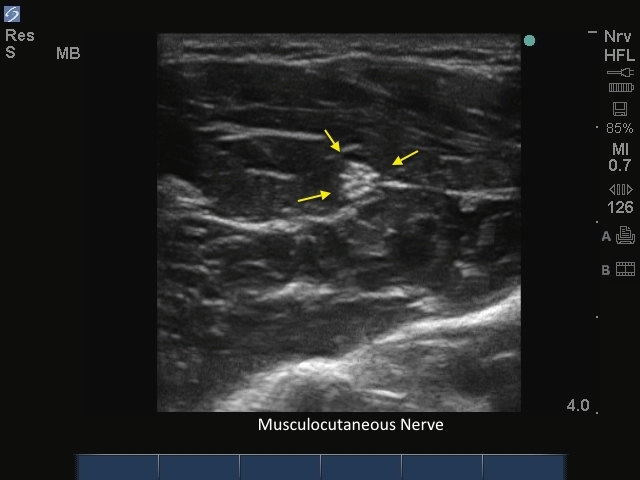
S Series: Sciatic Nerve Popliteal Vessels

S Series: Sciatic Nerve Popliteal Vessels

/sites/default/files/201410_Image_S-System_Sciatic_Nerve_Popliteal_Vessels.jpg

S Series: Sciatic Nerve Popliteal Vessels. Popliteal nerve block

Clinical Specialties
Media Library Type
Body

S Series: Sciatic Nerve Popliteal Vessels. Popliteal nerve block

S Series: System Overview

S Series: System Overview

/sites/default/files/Sonosite_S_Series_System_Overview_Thumb.jpg
Overview of your Sonosite S Series™ Ultrasound System.
Media Library Type
Subtitles
<p begin="00:00:25.632" end="00:00:28.547" style="s2">- [Voiceover] The Sonosite<br />S Series offers superb image</p>
<p begin="00:00:28.547" end="00:00:33.123" style="s2">quality in a compact and simple<br />to use ultrasound system.</p>
<p begin="00:00:33.123" end="00:00:35.704" style="s2">This short video will<br />demonstrate the system's</p>
<p begin="00:00:35.704" end="00:00:38.271" style="s2">key features and functions.</p>
<p begin="00:00:38.271" end="00:00:40.066" style="s2">For more in-depth information,</p>
<p begin="00:00:40.066" end="00:00:43.233" style="s2">please refer to the system user guide.</p>
<p begin="00:00:47.586" end="00:00:51.113" style="s2">The S Series operates<br />efficiently on either AC</p>
<p begin="00:00:51.113" end="00:00:52.582" style="s2">or battery power.</p>
<p begin="00:00:52.582" end="00:00:56.295" style="s2">To install the battery,<br />turn the system upside down.</p>
<p begin="00:00:56.295" end="00:00:59.234" style="s2">Place the battery into<br />the battery compartment.</p>
<p begin="00:00:59.234" end="00:01:03.323" style="s2">Push down on the cover until<br />the latch snaps into place.</p>
<p begin="00:01:03.323" end="00:01:06.225" style="s2">If the battery is being<br />installed for the first time</p>
<p begin="00:01:06.225" end="00:01:08.718" style="s2">it will need to be charged.</p>
<p begin="00:01:08.718" end="00:01:12.114" style="s2">To remove the battery, push<br />up on the locking lever</p>
<p begin="00:01:12.114" end="00:01:15.339" style="s2">and lift the battery from the compartment.</p>
<p begin="00:01:15.339" end="00:01:19.547" style="s2">Connect the power cord to<br />the system to use AC power.</p>
<p begin="00:01:19.547" end="00:01:23.055" style="s2">To turn the system on,<br />press the Power key.</p>
<p begin="00:01:23.055" end="00:01:27.836" style="s2">The system will power up<br />completely for use in 15 seconds.</p>
<p begin="00:01:27.836" end="00:01:31.677" style="s2">To connect a transducer,<br />insert the transducer connector</p>
<p begin="00:01:31.677" end="00:01:34.975" style="s2">with the latch up and rotated clockwise.</p>
<p begin="00:01:34.975" end="00:01:39.749" style="s2">Turn the latch counter-clockwise<br />and press the latch down.</p>
<p begin="00:01:39.749" end="00:01:42.686" style="s2">To remove the transducer,<br />pull the latch up</p>
<p begin="00:01:42.686" end="00:01:45.335" style="s2">and rotate it clockwise.</p>
<p begin="00:01:45.335" end="00:01:47.823" style="s2">On the back of the system<br />is an embedded mini-dock</p>
<p begin="00:01:47.823" end="00:01:50.597" style="s2">for connectivity and data transfer.</p>
<p begin="00:01:50.597" end="00:01:53.556" style="s2">There are ports for<br />Ethernet, digital video out,</p>
<p begin="00:01:53.556" end="00:01:55.554" style="s2">and two S-videos.</p>
<p begin="00:01:55.554" end="00:01:59.429" style="s2">There are also ports for an<br />audio jack, composite video,</p>
<p begin="00:01:59.429" end="00:02:03.961" style="s2">and nine-pin serial or<br />RS232 serial port, power,</p>
<p begin="00:02:03.961" end="00:02:05.461" style="s2">and two USB ports.</p>
<p begin="00:02:06.983" end="00:02:09.797" style="s2">On the right side of the<br />system there is an additional</p>
<p begin="00:02:09.797" end="00:02:13.838" style="s2">USB port and an audio jack for headphones.</p>
<p begin="00:02:13.838" end="00:02:16.568" style="s2">The USB ports can be<br />used for image storage</p>
<p begin="00:02:16.568" end="00:02:18.985" style="s2">and system software upgrades.</p>
<p begin="00:02:22.668" end="00:02:25.790" style="s2">The system control panel is simple to use.</p>
<p begin="00:02:25.790" end="00:02:28.490" style="s2">Many controls and features<br />are automated to simplify</p>
<p begin="00:02:28.490" end="00:02:32.826" style="s2">the user interface and<br />minimize the number of keys.</p>
<p begin="00:02:32.826" end="00:02:36.350" style="s2">The primary controls, or the<br />controls used most often,</p>
<p begin="00:02:36.350" end="00:02:38.186" style="s2">are located along the bottom edge</p>
<p begin="00:02:38.186" end="00:02:41.204" style="s2">of the image display screen.</p>
<p begin="00:02:41.204" end="00:02:44.310" style="s2">They secondary controls are<br />located along the left side</p>
<p begin="00:02:44.310" end="00:02:47.094" style="s2">of the ultrasound image display.</p>
<p begin="00:02:47.094" end="00:02:49.917" style="s2">In the lower middle of the<br />control panel is the touch pad</p>
<p begin="00:02:49.917" end="00:02:52.575" style="s2">which can be used to select, adjust,</p>
<p begin="00:02:52.575" end="00:02:55.335" style="s2">and move objects on the screen.</p>
<p begin="00:02:55.335" end="00:02:58.319" style="s2">The Select key is used to<br />make various choices depending</p>
<p begin="00:02:58.319" end="00:03:00.930" style="s2">upon the function that is activated.</p>
<p begin="00:03:00.930" end="00:03:04.072" style="s2">It is used to switch between<br />calipers for measurement,</p>
<p begin="00:03:04.072" end="00:03:07.239" style="s2">the zoom function, and the text forms.</p>
<p begin="00:03:11.759" end="00:03:15.154" style="s2">The first knob has multiple functions.</p>
<p begin="00:03:15.154" end="00:03:17.811" style="s2">When the system is in<br />imaging mode this knob</p>
<p begin="00:03:17.811" end="00:03:19.864" style="s2">controls the gain levels.</p>
<p begin="00:03:19.864" end="00:03:21.548" style="s2">There are three choices.</p>
<p begin="00:03:21.548" end="00:03:23.881" style="s2">Far, near, and overall gain.</p>
<p begin="00:03:25.144" end="00:03:28.123" style="s2">The system default is overall gain.</p>
<p begin="00:03:28.123" end="00:03:31.610" style="s2">To choose another gain setting,<br />push the knob to toggle</p>
<p begin="00:03:31.610" end="00:03:34.597" style="s2">between the gain settings.</p>
<p begin="00:03:34.597" end="00:03:38.022" style="s2">Near adjusts the gain<br />applied to the near field</p>
<p begin="00:03:38.022" end="00:03:39.105" style="s2">of the image.</p>
<p begin="00:03:40.227" end="00:03:44.394" style="s2">Far adjusts the gain applied<br />to the far field of the image.</p>
<p begin="00:03:45.250" end="00:03:48.702" style="s2">And overall adjusts the<br />overall gain applied</p>
<p begin="00:03:48.702" end="00:03:51.145" style="s2">to the entire image.</p>
<p begin="00:03:51.145" end="00:03:54.006" style="s2">When the system is in<br />Color Doppler Imaging mode,</p>
<p begin="00:03:54.006" end="00:03:56.408" style="s2">the first knob controls the overall gain</p>
<p begin="00:03:56.408" end="00:03:58.158" style="s2">of the color Doppler.</p>
<p begin="00:03:59.224" end="00:04:02.321" style="s2">When an image is frozen the<br />gain knob can also be used</p>
<p begin="00:04:02.321" end="00:04:05.139" style="s2">to review images in the seni buffer.</p>
<p begin="00:04:05.139" end="00:04:08.325" style="s2">Counter-clockwise and the<br />clockwise rotation of the knob</p>
<p begin="00:04:08.325" end="00:04:12.694" style="s2">scrolls backward and forward<br />through the stored images.</p>
<p begin="00:04:12.694" end="00:04:16.236" style="s2">The second knob is used for<br />adjustment of imaging depth.</p>
<p begin="00:04:16.236" end="00:04:19.109" style="s2">Turning the knob clockwise<br />increases the depth.</p>
<p begin="00:04:19.109" end="00:04:22.623" style="s2">Counter-clockwise decreases<br />the imaging depth.</p>
<p begin="00:04:22.623" end="00:04:25.032" style="s2">A beep sounds when the minimum or maximum</p>
<p begin="00:04:25.032" end="00:04:27.032" style="s2">of the range is reached.</p>
<p begin="00:04:28.377" end="00:04:31.071" style="s2">The Freeze button stops the live imaging</p>
<p begin="00:04:31.071" end="00:04:34.023" style="s2">and displays a frozen image.</p>
<p begin="00:04:34.023" end="00:04:37.331" style="s2">The Save button allows<br />you to save a frozen image</p>
<p begin="00:04:37.331" end="00:04:41.294" style="s2">to the internal storage of the system.</p>
<p begin="00:04:41.294" end="00:04:45.461" style="s2">Color turns color Doppler or<br />color power Doppler on and off.</p>
<p begin="00:04:50.557" end="00:04:53.692" style="s2">In the secondary controls,<br />page numbers are indicated</p>
<p begin="00:04:53.692" end="00:04:56.016" style="s2">at the bottom of the screen.</p>
<p begin="00:04:56.016" end="00:05:00.338" style="s2">Select the Page key to activate<br />the next page of controls.</p>
<p begin="00:05:00.338" end="00:05:02.914" style="s2">On the first page of<br />the secondary controls,</p>
<p begin="00:05:02.914" end="00:05:06.223" style="s2">the Patient key allows exam<br />information to be entered</p>
<p begin="00:05:06.223" end="00:05:10.753" style="s2">into the system, including<br />patient demographics.</p>
<p begin="00:05:10.753" end="00:05:13.933" style="s2">This screen is also used<br />to select the exam type,</p>
<p begin="00:05:13.933" end="00:05:16.472" style="s2">the exam label, and provide data regarding</p>
<p begin="00:05:16.472" end="00:05:19.411" style="s2">who performed the examination<br />and the institution</p>
<p begin="00:05:19.411" end="00:05:21.409" style="s2">where it was performed.</p>
<p begin="00:05:21.409" end="00:05:23.652" style="s2">Information entered here will be displayed</p>
<p begin="00:05:23.652" end="00:05:26.314" style="s2">on the image display screen.</p>
<p begin="00:05:26.314" end="00:05:29.534" style="s2">The Exam key can be selected<br />during a patient exam</p>
<p begin="00:05:29.534" end="00:05:32.838" style="s2">to quickly change exam types<br />without having to return</p>
<p begin="00:05:32.838" end="00:05:35.488" style="s2">to the patient data entry screen.</p>
<p begin="00:05:35.488" end="00:05:38.717" style="s2">The exam types menu lists<br />the exam types that are</p>
<p begin="00:05:38.717" end="00:05:41.777" style="s2">appropriate for the transducer selected.</p>
<p begin="00:05:41.777" end="00:05:44.999" style="s2">Selecting the appropriate<br />exam type ensures that</p>
<p begin="00:05:44.999" end="00:05:47.850" style="s2">system parameters have<br />been adjusted for optimal</p>
<p begin="00:05:47.850" end="00:05:50.933" style="s2">viewing of the structure of interest.</p>
<p begin="00:05:52.386" end="00:05:55.366" style="s2">The Clip key allows you to save a movie</p>
<p begin="00:05:55.366" end="00:05:57.288" style="s2">of the ultrasound image.</p>
<p begin="00:05:57.288" end="00:06:02.060" style="s2">A clip length from 2 - 60<br />seconds may be captured.</p>
<p begin="00:06:02.060" end="00:06:04.428" style="s2">The clip length to be saved is determined</p>
<p begin="00:06:04.428" end="00:06:06.511" style="s2">in the system setup menu.</p>
<p begin="00:06:10.022" end="00:06:13.734" style="s2">The Sonosite S Series system<br />can automatically adjust</p>
<p begin="00:06:13.734" end="00:06:17.005" style="s2">the 2D gain levels to the optimal level.</p>
<p begin="00:06:17.005" end="00:06:20.640" style="s2">Select Auto Gain to activate<br />this feature instead of</p>
<p begin="00:06:20.640" end="00:06:23.223" style="s2">using the manual gain controls.</p>
<p begin="00:06:24.268" end="00:06:26.966" style="s2">The second page of the<br />secondary controls includes</p>
<p begin="00:06:26.966" end="00:06:29.899" style="s2">the biopsy feature, which will depend upon</p>
<p begin="00:06:29.899" end="00:06:31.937" style="s2">the transducer type.</p>
<p begin="00:06:31.937" end="00:06:35.728" style="s2">Select Biopsy to display<br />the biopsy guidelines.</p>
<p begin="00:06:35.728" end="00:06:38.505" style="s2">Select again to turn off.</p>
<p begin="00:06:38.505" end="00:06:42.221" style="s2">Zoom magnifies the image<br />by a factor of two.</p>
<p begin="00:06:42.221" end="00:06:45.619" style="s2">Press once to choose<br />the region of interest.</p>
<p begin="00:06:45.619" end="00:06:47.741" style="s2">Use the touch pad to position<br />the region of interest</p>
<p begin="00:06:47.741" end="00:06:49.491" style="s2">box within the image.</p>
<p begin="00:06:50.440" end="00:06:55.012" style="s2">Press the Zoom key again to<br />magnify the area of interest.</p>
<p begin="00:06:55.012" end="00:06:58.095" style="s2">Press the Zoom or the 2D key to exit.</p>
<p begin="00:07:00.522" end="00:07:04.568" style="s2">The Zoom key feature is also<br />available on a frozen image.</p>
<p begin="00:07:04.568" end="00:07:08.452" style="s2">Press the Zoom key to activate<br />and the touch pad to pan</p>
<p begin="00:07:08.452" end="00:07:11.285" style="s2">the image to the area of interest.</p>
<p begin="00:07:13.181" end="00:07:17.233" style="s2">To optimize the image, select<br />2D optimization settings</p>
<p begin="00:07:17.233" end="00:07:20.100" style="s2">based on the patient's body habitus.</p>
<p begin="00:07:20.100" end="00:07:22.846" style="s2">The system will automatically<br />adjust features such as</p>
<p begin="00:07:22.846" end="00:07:26.929" style="s2">focal zones, transducer<br />frequency, and bandwidth.</p>
<p begin="00:07:28.889" end="00:07:32.453" style="s2">Res provides the best resolution possible.</p>
<p begin="00:07:32.453" end="00:07:37.152" style="s2">Gen provides a balance between<br />resolution and penetration.</p>
<p begin="00:07:37.152" end="00:07:40.735" style="s2">Pen provides the best<br />possible penetration.</p>
<p begin="00:07:42.237" end="00:07:46.235" style="s2">The image can be displayed<br />in four image orientations.</p>
<p begin="00:07:46.235" end="00:07:47.068" style="s2">Up right.</p>
<p begin="00:07:48.721" end="00:07:49.638" style="s2">Down right.</p>
<p begin="00:07:50.848" end="00:07:51.681" style="s2">Down left.</p>
<p begin="00:07:52.766" end="00:07:53.599" style="s2">Up left.</p>
<p begin="00:07:54.769" end="00:07:57.134" style="s2">Press the Orientation<br />key to scroll through</p>
<p begin="00:07:57.134" end="00:07:59.301" style="s2">the image display choices.</p>
<p begin="00:08:03.828" end="00:08:07.319" style="s2">Page three of the secondary<br />controls contains controls</p>
<p begin="00:08:07.319" end="00:08:10.736" style="s2">for image display brightness and sono MB.</p>
<p begin="00:08:11.736" end="00:08:14.081" style="s2">To change the system's screen brightness,</p>
<p begin="00:08:14.081" end="00:08:16.854" style="s2">select a setting from 1 - 10.</p>
<p begin="00:08:16.854" end="00:08:21.164" style="s2">Reset will change the setting<br />to the system default level.</p>
<p begin="00:08:21.164" end="00:08:25.448" style="s2">Sono MB reduces speckle noise<br />in the ultrasound image,</p>
<p begin="00:08:25.448" end="00:08:27.648" style="s2">improves contrast resolution,</p>
<p begin="00:08:27.648" end="00:08:31.339" style="s2">and enhances tissue<br />interfaces and boundaries.</p>
<p begin="00:08:31.339" end="00:08:34.321" style="s2">This feature can be turned<br />on or off but Sonosite</p>
<p begin="00:08:34.321" end="00:08:38.488" style="s2">recommends that sono MB be<br />used routinely for 2D imaging.</p>
<p begin="00:08:39.907" end="00:08:42.367" style="s2">To return to the first page of controls,</p>
<p begin="00:08:42.367" end="00:08:45.313" style="s2">select the 2D imaging key at the far right</p>
<p begin="00:08:45.313" end="00:08:47.719" style="s2">of the primary controls.</p>
<p begin="00:08:47.719" end="00:08:51.168" style="s2">When the ultrasound image<br />is frozen there are several</p>
<p begin="00:08:51.168" end="00:08:55.047" style="s2">features available to optimize the image.</p>
<p begin="00:08:55.047" end="00:08:57.740" style="s2">The image can be zoomed<br />to clearly identify</p>
<p begin="00:08:57.740" end="00:08:59.740" style="s2">a structure of interest.</p>
<p begin="00:09:02.030" end="00:09:04.529" style="s2">Or other frames may be<br />selected by scrolling</p>
<p begin="00:09:04.529" end="00:09:06.529" style="s2">through the seni buffer.</p>
<p begin="00:09:09.253" end="00:09:11.251" style="s2">Once the image is optimized,</p>
<p begin="00:09:11.251" end="00:09:14.818" style="s2">structures can be measured<br />by selecting Calipers.</p>
<p begin="00:09:14.818" end="00:09:17.795" style="s2">The generic Caliper button<br />activates up to eight</p>
<p begin="00:09:17.795" end="00:09:20.366" style="s2">sets of calipers on the screen.</p>
<p begin="00:09:20.366" end="00:09:24.533" style="s2">From this menu, area measurements<br />may also be selected.</p>
<p begin="00:09:28.099" end="00:09:31.773" style="s2">Select Save to send the<br />desired images to the internal</p>
<p begin="00:09:31.773" end="00:09:33.729" style="s2">storage of the system.</p>
<p begin="00:09:33.729" end="00:09:37.396" style="s2">Select Print to send<br />the image to a printer.</p>
Brightcove ID
5508123576001
https://youtube.com/watch?v=ZiNAK-VngM4

S Series: Performing an Ultrasound Exam

S Series: Performing an Ultrasound Exam

/sites/default/files/Sonosite_S_Series_Performing_An_Exam_Thumb.jpg
Learn basic system functions for scanning with your Sonosite S Series™ ultrasound system.
Media Library Type
Subtitles
<p begin="00:00:29.113" end="00:00:30.551" style="s2">- [Voiceover] The Sonosite S-Series</p>
<p begin="00:00:30.551" end="00:00:34.234" style="s2">has advanced automated image<br />optimization technology</p>
<p begin="00:00:34.234" end="00:00:37.341" style="s2">that greatly simplifies user controls.</p>
<p begin="00:00:37.341" end="00:00:40.631" style="s2">Many controls are automatically<br />adjusted by the system</p>
<p begin="00:00:40.631" end="00:00:43.124" style="s2">depending upon depth selection.</p>
<p begin="00:00:43.124" end="00:00:46.599" style="s2">Therefore, only a few controls<br />may need to be adjusted</p>
<p begin="00:00:46.599" end="00:00:49.356" style="s2">to obtain the best image quality.</p>
<p begin="00:00:49.356" end="00:00:51.846" style="s2">This tutorial will<br />review the key functions</p>
<p begin="00:00:51.846" end="00:00:55.456" style="s2">that are used most frequently<br />when optimizing an image.</p>
<p begin="00:00:55.456" end="00:00:59.009" style="s2">Please refer to the user guide<br />for a complete explanation</p>
<p begin="00:00:59.009" end="00:01:02.042" style="s2">of all controls that may be adjusted.</p>
<p begin="00:01:02.042" end="00:01:04.698" style="s2">To enter information on the patient form,</p>
<p begin="00:01:04.698" end="00:01:07.215" style="s2">place the cursor on the Last Name field</p>
<p begin="00:01:07.215" end="00:01:08.941" style="s2">and press Select.</p>
<p begin="00:01:08.941" end="00:01:11.594" style="s2">A soft keyboard will be displayed.</p>
<p begin="00:01:11.594" end="00:01:13.613" style="s2">Highlight the appropriate character,</p>
<p begin="00:01:13.613" end="00:01:17.492" style="s2">and press the Select<br />key to enter the text.</p>
<p begin="00:01:17.492" end="00:01:20.359" style="s2">Enter the information in<br />to the appropriate fields</p>
<p begin="00:01:20.359" end="00:01:23.387" style="s2">including patient name and ID number.</p>
<p begin="00:01:23.387" end="00:01:26.662" style="s2">This screen is also used<br />to select the exam type,</p>
<p begin="00:01:26.662" end="00:01:28.981" style="s2">the exam label, and provide data</p>
<p begin="00:01:28.981" end="00:01:31.400" style="s2">regarding who performed the examination</p>
<p begin="00:01:31.400" end="00:01:34.453" style="s2">and the institution<br />where it was performed.</p>
<p begin="00:01:34.453" end="00:01:36.914" style="s2">All information entered<br />here will be displayed</p>
<p begin="00:01:36.914" end="00:01:39.247" style="s2">on the image display screen.</p>
<p begin="00:01:40.088" end="00:01:42.415" style="s2">After you have entered<br />the patient information,</p>
<p begin="00:01:42.415" end="00:01:43.332" style="s2">press Done.</p>
<p begin="00:01:44.901" end="00:01:47.837" style="s2">Confirm the message,<br />"This is a new patient.</p>
<p begin="00:01:47.837" end="00:01:49.229" style="s2">"Do you want to continue?"</p>
<p begin="00:01:49.229" end="00:01:50.562" style="s2">by selecting OK.</p>
<p begin="00:01:53.400" end="00:01:55.114" style="s2">Once the patient is entered,</p>
<p begin="00:01:55.114" end="00:01:58.798" style="s2">all saved images are<br />linked to that patient.</p>
<p begin="00:01:58.798" end="00:02:02.013" style="s2">Patient information can<br />be edited during the exam</p>
<p begin="00:02:02.013" end="00:02:04.606" style="s2">by pressing the Patient key,</p>
<p begin="00:02:04.606" end="00:02:08.543" style="s2">however, if the patient<br />name or ID number changes,</p>
<p begin="00:02:08.543" end="00:02:11.298" style="s2">a new patient is created.</p>
<p begin="00:02:11.298" end="00:02:13.003" style="s2">If you have not already done so,</p>
<p begin="00:02:13.003" end="00:02:16.257" style="s2">select the exam type from<br />the secondary controls</p>
<p begin="00:02:16.257" end="00:02:18.772" style="s2">on the left of the image display.</p>
<p begin="00:02:18.772" end="00:02:20.655" style="s2">The exam choices available</p>
<p begin="00:02:20.655" end="00:02:24.065" style="s2">are dependent upon the<br />connected transducer.</p>
<p begin="00:02:24.065" end="00:02:27.683" style="s2">Selecting the exam type will<br />optimize the system settings</p>
<p begin="00:02:27.683" end="00:02:30.899" style="s2">for the clinical exam you have chosen.</p>
<p begin="00:02:30.899" end="00:02:35.654" style="s2">You may change the exam type<br />at any time during this study.</p>
<p begin="00:02:35.654" end="00:02:38.875" style="s2">The exam type symbol will<br />change in the top right corner</p>
<p begin="00:02:38.875" end="00:02:40.966" style="s2">or the image display to indicate</p>
<p begin="00:02:40.966" end="00:02:44.164" style="s2">the exam type has been selected.</p>
<p begin="00:02:44.164" end="00:02:46.595" style="s2">Use a coupling gel to remove any air</p>
<p begin="00:02:46.595" end="00:02:50.839" style="s2">between the transducer<br />face and the skin surface.</p>
<p begin="00:02:50.839" end="00:02:53.665" style="s2">Once you have located<br />the area of interest,</p>
<p begin="00:02:53.665" end="00:02:57.771" style="s2">adjust the depth of the image<br />to center the area of interest</p>
<p begin="00:02:57.771" end="00:03:00.730" style="s2">in the middle of the image display.</p>
<p begin="00:03:00.730" end="00:03:04.013" style="s2">For quick optimization of the<br />gain settings on the system,</p>
<p begin="00:03:04.013" end="00:03:06.016" style="s2">press the Auto Gain key.</p>
<p begin="00:03:06.016" end="00:03:08.093" style="s2">The system will evaluate the image</p>
<p begin="00:03:08.093" end="00:03:11.963" style="s2">and apply the appropriate<br />gain level settings.</p>
<p begin="00:03:11.963" end="00:03:14.565" style="s2">If you would prefer to<br />change the gain settings,</p>
<p begin="00:03:14.565" end="00:03:16.832" style="s2">turn the Gain knob to the Near,</p>
<p begin="00:03:16.832" end="00:03:19.621" style="s2">Far, or default Overall mode.</p>
<p begin="00:03:19.621" end="00:03:22.447" style="s2">This will increase or<br />decrease the amount of gain</p>
<p begin="00:03:22.447" end="00:03:27.281" style="s2">applied to the Near field, Far<br />field, or the Overall image.</p>
<p begin="00:03:27.281" end="00:03:30.531" style="s2">To toggle between gain<br />compensation selections,</p>
<p begin="00:03:30.531" end="00:03:32.985" style="s2">press the Gain knob.</p>
<p begin="00:03:32.985" end="00:03:35.177" style="s2">Once the desired image is obtained,</p>
<p begin="00:03:35.177" end="00:03:37.063" style="s2">you may freeze the image.</p>
<p begin="00:03:37.063" end="00:03:39.713" style="s2">At this point, you may save the image,</p>
<p begin="00:03:39.713" end="00:03:43.380" style="s2">review individual frames<br />in the cine buffer,</p>
<p begin="00:03:45.199" end="00:03:46.449" style="s2">zoom the image,</p>
<p begin="00:03:50.752" end="00:03:52.502" style="s2">or take measurements.</p>
<p begin="00:03:55.397" end="00:03:59.362" style="s2">The cine buffer can be<br />accessed using the Gain knob.</p>
<p begin="00:03:59.362" end="00:04:01.633" style="s2">Turning the Gain knob counterclockwise</p>
<p begin="00:04:01.633" end="00:04:04.309" style="s2">reviews images retrospectively,</p>
<p begin="00:04:04.309" end="00:04:06.484" style="s2">and moving the Gain knob clockwise</p>
<p begin="00:04:06.484" end="00:04:09.220" style="s2">reviews images prospectively.</p>
<p begin="00:04:09.220" end="00:04:11.546" style="s2">The frame number will change dynamically</p>
<p begin="00:04:11.546" end="00:04:14.691" style="s2">as the Gain knob is manipulated.</p>
<p begin="00:04:14.691" end="00:04:18.043" style="s2">Press the Zoom key to<br />activate the touch pad</p>
<p begin="00:04:18.043" end="00:04:21.685" style="s2">to pan the image to the area of interest.</p>
<p begin="00:04:21.685" end="00:04:25.441" style="s2">A measurement may be<br />performed on a frozen image.</p>
<p begin="00:04:25.441" end="00:04:29.229" style="s2">Activate calipers by<br />pressing the Caliper key.</p>
<p begin="00:04:29.229" end="00:04:31.450" style="s2">Move the caliper to the point of interest</p>
<p begin="00:04:31.450" end="00:04:33.367" style="s2">by using the touch pad.</p>
<p begin="00:04:34.239" end="00:04:36.321" style="s2">To measure from the skin surface,</p>
<p begin="00:04:36.321" end="00:04:39.825" style="s2">place the caliper at the area of interest.</p>
<p begin="00:04:39.825" end="00:04:41.647" style="s2">An active measurement will be displayed</p>
<p begin="00:04:41.647" end="00:04:45.651" style="s2">in the bottom left corner<br />of the image display.</p>
<p begin="00:04:45.651" end="00:04:47.844" style="s2">To perform a linear measurement,</p>
<p begin="00:04:47.844" end="00:04:50.206" style="s2">place the caliper at the point of interest</p>
<p begin="00:04:50.206" end="00:04:52.727" style="s2">and press the Set key.</p>
<p begin="00:04:52.727" end="00:04:55.489" style="s2">Another caliper will be activated.</p>
<p begin="00:04:55.489" end="00:04:57.567" style="s2">Move the caliper to the point of interest</p>
<p begin="00:04:57.567" end="00:04:59.900" style="s2">to complete the measurement.</p>
<p begin="00:05:02.221" end="00:05:03.961" style="s2">Area measurements may be obtained</p>
<p begin="00:05:03.961" end="00:05:06.294" style="s2">by using the Ellipse Method.</p>
<p begin="00:05:15.048" end="00:05:17.385" style="s2">If further image optimization is needed</p>
<p begin="00:05:17.385" end="00:05:19.836" style="s2">based on the patient's body habitus,</p>
<p begin="00:05:19.836" end="00:05:23.342" style="s2">select the 2D Optimization<br />feature on page two</p>
<p begin="00:05:23.342" end="00:05:26.225" style="s2">of the secondary controls.</p>
<p begin="00:05:26.225" end="00:05:28.710" style="s2">This feature automatically<br />adjusts features</p>
<p begin="00:05:28.710" end="00:05:32.877" style="s2">such as focal zones, transducer<br />frequency, and bandwidth.</p>
<p begin="00:05:34.232" end="00:05:37.578" style="s2">Res provides the best resolution possible.</p>
<p begin="00:05:37.578" end="00:05:41.740" style="s2">Gen provides a balance between<br />resolution and penetration.</p>
<p begin="00:05:41.740" end="00:05:45.547" style="s2">Pen provides the best<br />possible penetration.</p>
<p begin="00:05:45.547" end="00:05:48.655" style="s2">Color Doppler may be<br />used to quickly identify</p>
<p begin="00:05:48.655" end="00:05:51.803" style="s2">where blood flow is<br />located in a structure.</p>
<p begin="00:05:51.803" end="00:05:54.865" style="s2">Press the Color key to<br />activate Color Doppler</p>
<p begin="00:05:54.865" end="00:05:57.328" style="s2">or Color Power Doppler.</p>
<p begin="00:05:57.328" end="00:05:59.833" style="s2">A region of interest or ROI box</p>
<p begin="00:05:59.833" end="00:06:02.664" style="s2">will appear in the center of the screen.</p>
<p begin="00:06:02.664" end="00:06:06.831" style="s2">Use the touch pad to change<br />the position of the ROI box.</p>
<p begin="00:06:07.962" end="00:06:10.413" style="s2">The system settings for<br />color will be displayed</p>
<p begin="00:06:10.413" end="00:06:13.679" style="s2">in the top left corner of the screen.</p>
<p begin="00:06:13.679" end="00:06:17.059" style="s2">Use the Gain knob to adjust<br />the overall color gain level</p>
<p begin="00:06:17.059" end="00:06:20.895" style="s2">for Color Power Doppler or Color Doppler.</p>
<p begin="00:06:20.895" end="00:06:22.838" style="s2">When you freeze a color image,</p>
<p begin="00:06:22.838" end="00:06:24.701" style="s2">the Gain knob can also be used</p>
<p begin="00:06:24.701" end="00:06:28.618" style="s2">to review individual<br />frames in the cine buffer.</p>
<p begin="00:06:29.978" end="00:06:33.395" style="s2">Press the 2D key to return to 2D imaging.</p>
<p begin="00:06:34.662" end="00:06:36.568" style="s2">When you are ready to store your image,</p>
<p begin="00:06:36.568" end="00:06:39.229" style="s2">press the Save key to save the image</p>
<p begin="00:06:39.229" end="00:06:41.847" style="s2">to the internal storage.</p>
<p begin="00:06:41.847" end="00:06:45.797" style="s2">The capacity of the internal<br />storage is four gigabytes,</p>
<p begin="00:06:45.797" end="00:06:48.380" style="s2">or approximately 32,000 images.</p>
<p begin="00:06:49.644" end="00:06:53.036" style="s2">To save an image clip, press the Clip key.</p>
<p begin="00:06:53.036" end="00:06:55.796" style="s2">Clips are stored prospectively.</p>
<p begin="00:06:55.796" end="00:06:59.359" style="s2">The length of the clip can be<br />determined on the Clip menu.</p>
<p begin="00:06:59.359" end="00:07:03.526" style="s2">A clip length of two to 60<br />seconds can be selected.</p>
<p begin="00:07:07.013" end="00:07:09.794" style="s2">The clip may be reviewed by selecting List</p>
<p begin="00:07:09.794" end="00:07:13.877" style="s2">in the patient exam list,<br />and then pressing Play.</p>
<p begin="00:07:16.553" end="00:07:20.004" style="s2">When you have acquired all<br />images and clips for the study,</p>
<p begin="00:07:20.004" end="00:07:23.451" style="s2">press the Patient key and choose End Exam</p>
<p begin="00:07:23.451" end="00:07:26.303" style="s2">from the onscreen menu<br />to finalize the exam</p>
<p begin="00:07:26.303" end="00:07:27.803" style="s2">and end the study.</p>
<p begin="00:07:28.998" end="00:07:32.068" style="s2">This concludes this brief<br />review of imaging modes</p>
<p begin="00:07:32.068" end="00:07:36.525" style="s2">and system controls to<br />optimize the ultrasound image.</p>
<p begin="00:07:36.525" end="00:07:39.901" style="s2">For an extensive review of<br />system features and functions,</p>
<p begin="00:07:39.901" end="00:07:43.151" style="s2">please refer to the system user guide.</p>
Brightcove ID
5508123514001
https://youtube.com/watch?v=OtSVw7Rd2HI

S Series: Image Review and Export

S Series: Image Review and Export

/sites/default/files/Sonosite_S_Series_Image_Review_and_Export_Thumb.jpg
Learn how to review and export images on your Sonosite S Series™ Ultrasound System.
Media Library Type
Subtitles
<p begin="00:00:24.904" end="00:00:26.421" style="s2">- [Voiceover] This video will demonstrate</p>
<p begin="00:00:26.421" end="00:00:29.829" style="s2">how to save images and<br />clips, recall these images</p>
<p begin="00:00:29.829" end="00:00:33.118" style="s2">for review, and archive or export images</p>
<p begin="00:00:33.118" end="00:00:34.451" style="s2">to a USB device.</p>
<p begin="00:00:36.140" end="00:00:38.549" style="s2">Images or clips of the ultrasound study</p>
<p begin="00:00:38.549" end="00:00:41.296" style="s2">may be obtained and<br />saved to internal storage</p>
<p begin="00:00:41.296" end="00:00:42.463" style="s2">on the system.</p>
<p begin="00:00:43.498" end="00:00:48.087" style="s2">To save a frozen image,<br />select the Save button.</p>
<p begin="00:00:48.087" end="00:00:50.173" style="s2">Images of the screen display can be saved</p>
<p begin="00:00:50.173" end="00:00:51.756" style="s2">to print or export.</p>
<p begin="00:00:54.269" end="00:00:58.364" style="s2">To save an image clip, press the Clip key.</p>
<p begin="00:00:58.364" end="00:01:00.947" style="s2">Clips are stored prospectively.</p>
<p begin="00:01:01.985" end="00:01:04.079" style="s2">The length of the clip storage is selected</p>
<p begin="00:01:04.079" end="00:01:06.095" style="s2">in the Presets menu.</p>
<p begin="00:01:06.095" end="00:01:10.262" style="s2">A clip length of two to 60<br />seconds can be selected.</p>
<p begin="00:01:11.948" end="00:01:14.516" style="s2">Press the Review key to view the images</p>
<p begin="00:01:14.516" end="00:01:17.159" style="s2">and clips from the<br />current study and display</p>
<p begin="00:01:17.159" end="00:01:19.590" style="s2">all exams stored on the internal storage</p>
<p begin="00:01:19.590" end="00:01:22.106" style="s2">of the ultrasound system.</p>
<p begin="00:01:22.106" end="00:01:25.250" style="s2">The list can be displayed alphabetically</p>
<p begin="00:01:25.250" end="00:01:28.917" style="s2">or by the order of<br />archival, A to Z, Z to A,</p>
<p begin="00:01:29.905" end="00:01:31.988" style="s2">most recent, or earliest.</p>
<p begin="00:01:33.042" end="00:01:35.186" style="s2">The header at the top of the screen</p>
<p begin="00:01:35.186" end="00:01:37.908" style="s2">identifies patient and image information</p>
<p begin="00:01:37.908" end="00:01:39.448" style="s2">for the study.</p>
<p begin="00:01:39.448" end="00:01:42.912" style="s2">This includes patient name, ID number,</p>
<p begin="00:01:42.912" end="00:01:46.868" style="s2">date and time of the<br />exam, the user's initials,</p>
<p begin="00:01:46.868" end="00:01:50.535" style="s2">images and clips acquired,<br />and connectivity.</p>
<p begin="00:01:51.506" end="00:01:54.972" style="s2">To review a patient exam,<br />select a patient exam</p>
<p begin="00:01:54.972" end="00:01:56.511" style="s2">from the list.</p>
<p begin="00:01:56.511" end="00:01:59.094" style="s2">The exam highlighted is active.</p>
<p begin="00:02:00.204" end="00:02:02.988" style="s2">To select a patient exam to archive,</p>
<p begin="00:02:02.988" end="00:02:05.625" style="s2">check the box on the left.</p>
<p begin="00:02:05.625" end="00:02:08.280" style="s2">To choose additional<br />patients, just scroll down</p>
<p begin="00:02:08.280" end="00:02:10.630" style="s2">and select each exam.</p>
<p begin="00:02:10.630" end="00:02:13.352" style="s2">Notice each patient exam has a check mark</p>
<p begin="00:02:13.352" end="00:02:15.853" style="s2">to indicate it is included.</p>
<p begin="00:02:15.853" end="00:02:17.975" style="s2">Once you have completed the selection,</p>
<p begin="00:02:17.975" end="00:02:22.142" style="s2">select Export to send all<br />images to the USB device.</p>
<p begin="00:02:23.233" end="00:02:26.379" style="s2">Up to three USB devices may be connected</p>
<p begin="00:02:26.379" end="00:02:28.546" style="s2">to the system at one time.</p>
<p begin="00:02:29.886" end="00:02:34.582" style="s2">This is a brief overview of<br />image review and archival.</p>
<p begin="00:02:34.582" end="00:02:36.176" style="s2">For more complete information,</p>
<p begin="00:02:36.176" end="00:02:38.759" style="s2">please refer to the user guide.</p>
Brightcove ID
5508109912001
https://youtube.com/watch?v=g5JaXOqsjXA

Advanced Needle Visualization for Primary Care

Advanced Needle Visualization for Primary Care

/sites/default/files/1.4.5_ANV_PC_iphone_thumbnail.jpg
Sonosite's Advanced Needle Visualization brightens the appearance of the needle at the touch of a button. This video discusses the technology from the perspective of a primary care physician.
Media Library Type
Subtitles
<p begin="00:00:02.881" end="00:00:04.710" style="s2">- Soon as we turn on the function of the</p>
<p begin="00:00:04.710" end="00:00:09.042" style="s2">advanced neo visualization, the<br />image quality stays the same</p>
<p begin="00:00:09.042" end="00:00:13.209" style="s2">and we just see greater echos<br />when we insert the needle.</p>
<p begin="00:00:19.386" end="00:00:21.172" style="s2">So I haven't noted any decrement to the</p>
<p begin="00:00:21.172" end="00:00:23.864" style="s2">image resolution and quality.</p>
<p begin="00:00:23.864" end="00:00:26.957" style="s2">In my practice it's really<br />added increased speed.</p>
<p begin="00:00:26.957" end="00:00:30.492" style="s2">I'm getting to the target<br />more directly with less time.</p>
<p begin="00:00:30.492" end="00:00:33.267" style="s2">Getting in and out, which<br />always makes the patient happier</p>
<p begin="00:00:33.267" end="00:00:35.589" style="s2">and certainly it reduces<br />the amount of pain</p>
<p begin="00:00:35.589" end="00:00:38.063" style="s2">that might be involved in a procedure.</p>
<p begin="00:00:38.063" end="00:00:40.614" style="s2">- So the ability to see the<br />needle going through tissue</p>
<p begin="00:00:40.614" end="00:00:43.197" style="s2">makes their clinical procedures safer,</p>
<p begin="00:00:43.197" end="00:00:46.169" style="s2">makes it faster, obviously<br />better for the patient.</p>
<p begin="00:00:46.169" end="00:00:49.649" style="s2">- It appears maybe two,<br />three, four times brighter.</p>
<p begin="00:00:49.649" end="00:00:52.315" style="s2">Seems to have a better echo<br />during the entire procedure.</p>
<p begin="00:00:52.315" end="00:00:55.471" style="s2">- Basically, the enhanced<br />visualization technology</p>
<p begin="00:00:55.471" end="00:00:58.939" style="s2">is a softer grade, and<br />it's very easy to use.</p>
<p begin="00:00:58.939" end="00:01:01.561" style="s2">There's no extra equipment<br />or specialty needles</p>
<p begin="00:01:01.561" end="00:01:04.168" style="s2">that have to be part of the procedure.</p>
<p begin="00:01:04.168" end="00:01:06.587" style="s2">Hard to close, it works<br />with any needle out there,</p>
<p begin="00:01:06.587" end="00:01:09.099" style="s2">and it's basically available<br />at the push of a button.</p>
<p begin="00:01:09.099" end="00:01:11.309" style="s2">- The beauty of it is that<br />there really is no setup time.</p>
<p begin="00:01:11.309" end="00:01:12.997" style="s2">It actually speeds up the procedure</p>
<p begin="00:01:12.997" end="00:01:14.621" style="s2">'cause it's easier to see the needle.</p>
<p begin="00:01:14.621" end="00:01:17.660" style="s2">So if anything it's a<br />time saving technique.</p>
<p begin="00:01:17.660" end="00:01:20.502" style="s2">I think it really can enhance learning</p>
<p begin="00:01:20.502" end="00:01:23.453" style="s2">and becoming competent<br />in performing aspirations</p>
<p begin="00:01:23.453" end="00:01:24.979" style="s2">and biopsies and a variety of different</p>
<p begin="00:01:24.979" end="00:01:26.977" style="s2">needle localization techniques</p>
<p begin="00:01:26.977" end="00:01:29.690" style="s2">in a much quicker, safer fashion.</p>
<p begin="00:01:29.690" end="00:01:31.370" style="s2">- There's really no<br />other competitor that has</p>
<p begin="00:01:31.370" end="00:01:33.840" style="s2">anything quite like what we're doing.</p>
<p begin="00:01:33.840" end="00:01:35.199" style="s2">There's a few technologies out there</p>
<p begin="00:01:35.199" end="00:01:37.569" style="s2">that try to help see the needle tip.</p>
<p begin="00:01:37.569" end="00:01:39.070" style="s2">The bigger issue I see with those</p>
<p begin="00:01:39.070" end="00:01:41.149" style="s2">is that they take a long time to set up,</p>
<p begin="00:01:41.149" end="00:01:42.569" style="s2">and they're also expensive.</p>
<p begin="00:01:42.569" end="00:01:44.094" style="s2">There's hardware involved.</p>
<p begin="00:01:44.094" end="00:01:46.232" style="s2">This was a proprietary software algorithm</p>
<p begin="00:01:46.232" end="00:01:49.735" style="s2">that we can upgrade any turbo<br />or S system on the market.</p>
<p begin="00:01:49.735" end="00:01:51.977" style="s2">- You get all the visualization<br />that you really need</p>
<p begin="00:01:51.977" end="00:01:53.971" style="s2">and you don't need to<br />use any special needles,</p>
<p begin="00:01:53.971" end="00:01:56.041" style="s2">you don't need to use a larger needle.</p>
<p begin="00:01:56.041" end="00:01:57.848" style="s2">The larger the caliber of the needle,</p>
<p begin="00:01:57.848" end="00:02:00.593" style="s2">the more painful and the more<br />potential for complications</p>
<p begin="00:02:00.593" end="00:02:04.488" style="s2">so I get great visualization<br />with a 25 gauge needle.</p>
<p begin="00:02:04.488" end="00:02:07.485" style="s2">- The reason we're excited<br />is because now we can</p>
<p begin="00:02:07.485" end="00:02:10.264" style="s2">for the first time say<br />that stick needle angles</p>
<p begin="00:02:10.264" end="00:02:13.201" style="s2">are no longer a problem<br />for ultrasound imaging.</p>
<p begin="00:02:13.201" end="00:02:14.587" style="s2">- I think it's one of our biggest</p>
<p begin="00:02:14.587" end="00:02:16.362" style="s2">breakthroughs in a long time,</p>
<p begin="00:02:16.362" end="00:02:17.843" style="s2">and again it meets the criteria.</p>
<p begin="00:02:17.843" end="00:02:19.925" style="s2">It addresses a real<br />problem that our customers</p>
<p begin="00:02:19.925" end="00:02:22.706" style="s2">and our clinicians are<br />dealing with every day.</p>
<p begin="00:02:22.706" end="00:02:26.026" style="s2">It's inexpensive, it's<br />simple, and it works.</p>
<p begin="00:02:26.026" end="00:02:28.350" style="s2">- It is a game changer in the market</p>
<p begin="00:02:28.350" end="00:02:31.017" style="s2">of ultrasound guided procedures.</p>
<p begin="00:02:31.886" end="00:02:34.553" style="s2">It's the speed, the ease of use,</p>
<p begin="00:02:35.700" end="00:02:39.602" style="s2">the reduction of time to<br />completion of the procedure,</p>
<p begin="00:02:39.602" end="00:02:42.084" style="s2">the safety features, all of those are</p>
<p begin="00:02:42.084" end="00:02:46.167" style="s2">a win-win situation for<br />doctor and patient alike.</p>
Brightcove ID
5508117994001
https://www.youtube.com/watch?v=uScA7ilzdvM